

Overcoming limitatons, Part 1
Midjourney and Stable Diffusion are quite limited in what they can produce from scratch. And espcecially if you want to create very special results (i.e. illustrations for short stories in my case) this can become very frustrating. This is due to the focus of the training of the engines, and the source images that were used in the training process.
This is the first article in what probably will be a set of 2.
All my example images are rendered with Stable Diffusion 1.5. Each time you read “Render Engine” in this article, it means: “Stable Diffusion checkpoint”.
To give you some idea, below is an example of the level of detail that can be gained by simply re-rendering the same image in the Img2Img section of the 1111 Stable Diffusion WebUI.
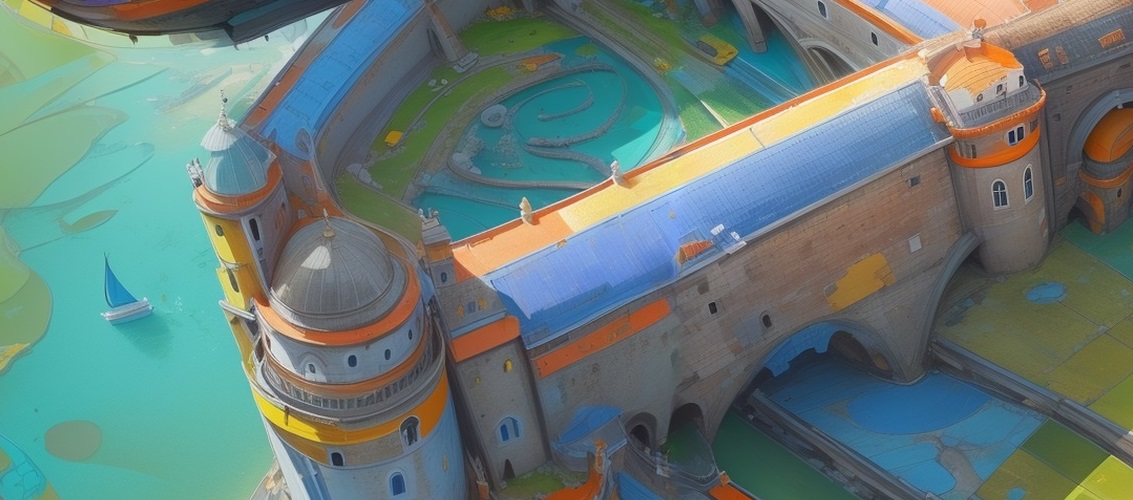
Detail of rendered image. Done with SD 1.5

Above: Detail of the detail of my 3076 x 3076 pixels render of “a spaceship flying over a fortress”. You can see the uncorrected error in the roof of the tower in the top-part of the image and how things do not properly align in the towers. (See “Step 2” on how to avoid these. I was too lazy to bother, in this case.)
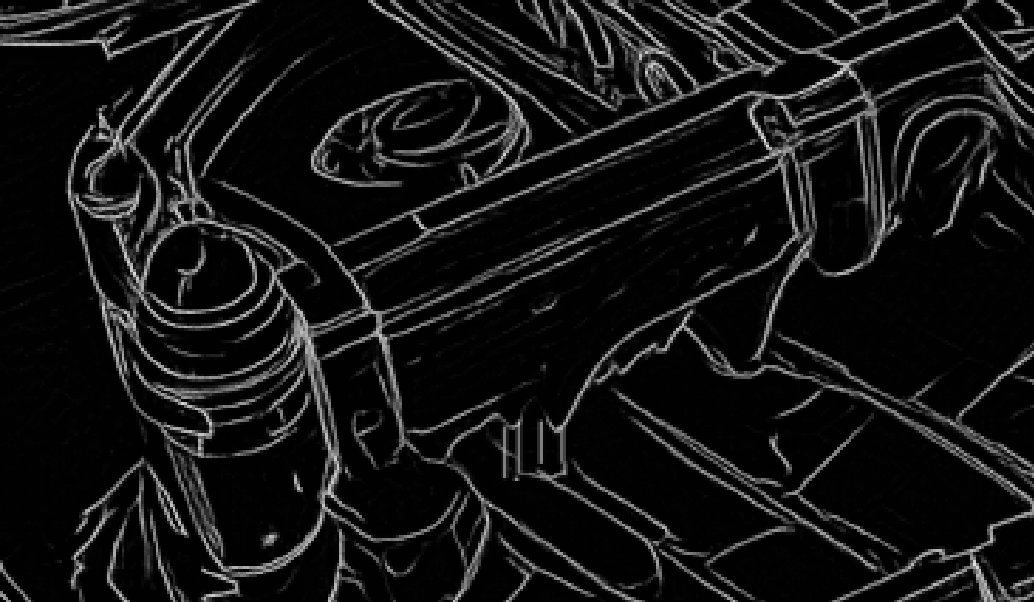
Above: The LineArt-map used to force the shapes in the render. Stable Diffusion does an amazing job identifying what is what in LineArt maps like this. Thanks to its training.
More control? Push the engine in a specific direction
The more control you want over the outcome, the more you will have push the engine in a certain direction. this can be done using:
- Depth map and lineart – With the depth map and LinAart-map (see example above), you can tell the engine: “these are the shapes I want”.
- img2img – Once the collage is made, I uses
- Tile, t2iAdapter – If you want to enforce certain shapes and colors.
- Precision – Sloppy lines in (auto-generated) LineArt maps will lead to confused and confusing shapes in the output render. The more attention is paid to details, the better the end result will be.
Basic assumptions
I assume that you are already familiar with Stable Diffusion and MidJourney and that you have a tool like SD 1111 already installed on your local machine. If not, then consider this article an introductional read on how to use AI to help you create whatever you want, fast(er than doing it all without those tools).
Separate article: 100% control using light and shadow
I have a separate workflow using Icolab Recolor and light-maps, for images I want 100% control over. These maps can be either hand-drawn, or produced with Blender or another 3d Engine. This workflow can then be used to further refine the results, but is not dependent on Recolor.
“But.. is it art?”
There are many opinions on what is art, and what is just an illustration or nothing at all. Something you created, based on your own drawings, 3D work, posing in tools like DAZ3d, IS your creation, as far as the things diplayed are created by you (clothing for 3D models obtained from 3rd sources are –for instance– not your creation).
Since the rendere engines (the Stable Diffision checkpoints) do all the details, shadings and so on, you are more like a client and a producer, assigning Stable Diffusion to draw something (specific) for you.
While your input and your choices in each step of the process determine the end-result, something else did the actual rendering of all the visual end results. Not you.
This workflow
The steps for this workflow are given below:
Why I am not using the upscaling method you find on YouTube
I found that first upscalin the image using the “Extra’s” tab, and then re-rendering the upscaled image using Img2Img gives a much better result for several reasons:
- More control – Over individual sub-renders and details in those renders. By doing topi-per-topic sub-renders, but also by varying the noise reduction and by switching render-engines / Checkpoints.
- More detail – Upscaling first, as a separate process, and then re-rendering the image in Img2Img delivers a ton of detail I do not get when using the Img2Img upscale method you find on YouTube.
Basis for this article: using Mashups
Or: The lazy approach
When I am feeling lazy, I let MidJourney and / or Stable Diffusion do my work. In this case: rendering the spaceship and the fortress. (I usually do some renders, select the results that are not a total shit, and work from there.)
The idea is to get things done quickly by using images you did not create yourself, as a starting point to base a new drawing on.

Above: Images used in the mashup. The fortress was rendered with Stable Diffusion. The spaceship with MidJourney. To assure the shadow is in the same direction, the fortresss was mirrored horizontally.

One of the older mashups, different fortress. Spaceship already re-rendered using the process described below. I wanted something on several layers of elevation. So I choose another image in the end.
Are your stealing when doing this?
This question has several answers between: yes, no, and probably. Lets look at each of them:
- Yes / probably, in case of..: If your render has elements that look a lot like the elements you used from online sources and existing images. But even if an image was generate by AI, you might still plagiarize existing work, even if you are not aware of this. The law is quite clear on this.
- No, probably not, in case of..: If you create your own input-sets (LineArt maps, poses, etc) from scratch, based on your own drawings, 3D-renders, etcetera, you will very likely create an unique new image. However: if your result is recognizably based on existing work and or existing poses or compositions of elements by other artists, your work will very likely still be considered plagiarism, UNLESS the source metarials were licenced to you, OR the work it is based on is public domain, OR when your work is undisputable a work of satire.
To be sure, I normally use Blender for the center-elements, like spaceschips, my characters (mostly for the poses and the light/shadows) props (like helmets, vehicles, ..) and so on. Since this is an example-image and I do not intend to do much of importance with this image, I did not check whethere Midjourney generated a truly original spaceship. I highly doubt it did, though. And so the illutration I created, is probably problematic in this context.
Step 1: create a proper set of base-images
Step 1 is to put ideas into images. Several tools and sources are used for this (see below). If exiusting images are used from the web as a stepping stone, I make sure that these are transformed (see step 2), as I want to be sure that my work is really “mine” and not plagiarism. One example of such images are environmental images. Feeding Stable Diffusion a base image, will help it understand what I am looking for, making the image-creation much more focused.
Base resolution
I use SD 1.5 and 1024 x 1024 or 1200 x 1200 as my base resolution for the rendering. In the process as described, LineArt and Depth in ControlNet will assure that the render engine will not produce weird results.
Tools and basic steps in order:
- txt2Img with Midjourney, Stable diffusion – To generate (base) images.
- IP-Adapter, if images from the web are used – Usually I want someting like the images I find online. Using IP-adapter and keywords, so the engine understands what it is and what I am looking for, and by using several different checkpoints, to transform existing images from the web (i.e landscapes) I am able to create something new and unique that is more catered to my personal needs.
- Inpaint and Loras – In Stable Diffusion. To specialized parts of the image, or redo large parts. Loras with specific themes can help focus the re-render of parts of the image towards a more desired result.
- Krita – To create composite images / to combine several images from several sources.
- ControlNet: Lineart, Tile, Depth in Stable Diffusion – To “extract” the shapes and definitions and force the new renders to look like my composite image.
- Render using img2img – With a high value for denoising strenght, and no scaling and using lineart, Tile and the depth-map, to re-render the composite image into several more focused variations. The denoising strenght will determine how many new elements will be added. The keywords will determing the color schemes and such. I usually combine several renders.
- X/Y/Z plot – script, using different checkpoints – To find the right base-image (colors, atmosphere) to work from, using keywords to describe what is in the image.
Step 6 will do several things:
- Unify the composite image – Where the sources have different color schemes, the render-process in step 5 will ignore those, and create new images based on the shapes and keywords (I use explicit colors, for instance, to get something that is more pleasing to me)
- Add variations and details – Each render engine will interpret the lineart and depth in a different way, creating seeral variations I can then work from.
Changing the buildings
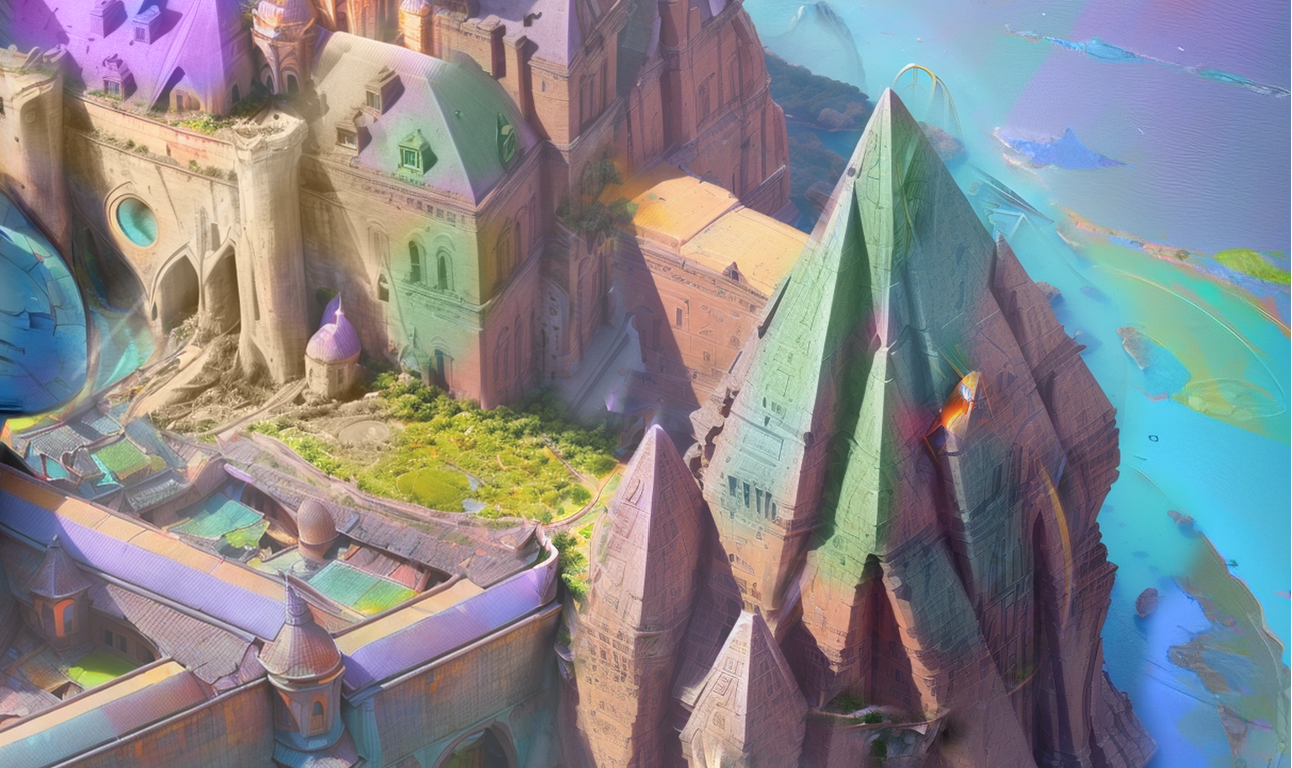
The first shape produces was a pyramid-shape. But i wanted something else, with more rounded shapes, that fitted more into the other part of the fortress.

Doing several renders, with the method described above, with noise reduction set to .75, I rendered several shapes. The ones below became the ultimate choice out of many iterations..

Notice the kind of “offness” in the shape of the dome and underlying structure. This is due to me not cleaning / correcting my LineArt-map. in brief: the more I clean up my LineArt-map, the better the overall shapes will become and the less the image looks like it is rendered by an AI (due to all the little mistakes that are made by the AI).
Step 2: Assuring good quality renders
Several things are important to determine the quality of the renders:
- The quality and type of depth map – The more each oobject is separated from others, the better the render engine knows what to do. I prefer to use Depth – Zoe.
- The resolution and quality of the lineArt map – Poor lines will create poor results. This will show mostly with geometric shapes like circles, lines and squares. I prefer a resolution of 1024 x 1024 for my lineArt maps. It is sufficient for details and works both for high-res renders and the initial image-generations.
- The quality of the mashup / no malformed elements – When moving towards the final renders in high resolution, it is important that the base image (1024 x 1024 in my case) already is a clean image with all malformed elements removed and corrected. Malformed shapes are easier corrected in the “low res” image, due to shorter render times on each new iteration, than doing this in high-res (3000 x 3000 pixels and higher).
- Your choice of Checkpoint – On CivitAI and other places, you can find tons of checkpoints / render engines. What I do is this: I create a base test-setup (prompts, Controlent LineArt / Depth map, etc) for my desired illustrative end-result. I then run it over all the checkpoints I have downloaded. Those that deliver the best results with the least amount of effort (no- or minumal negative prompting), can remain on my hardrive. Those who deliver crappy results are ignored or deleted.
To assure that my renders are the best quality the render engine can produce, I usually clean up the LineArt maps (in Krita for now, using new layers to keep the original intact). I also assure that my Depth maps are up to date with my mashups, so they will enforce the proper shapes / depth on the render engine.
Step 3: Combine the rendered base images, Upscale
Once I have results that are towards what I desire, I combine them into a new composite. Due to the color scheme, the images usually combine quite well.
- Krita – To combine the images and make the final image
- Extras: upscale – To scale the image to the desired size.
For upsccale I use ESGRAN 4x and 4x Ultrasharp. I scale up to 3x / 3076 x 3076. This is small enough to make the new renders fast, and large enough to get a boatload of nice details.
Step 4: Render upscaled image towards final version
Then I render again, using:
- Img2Img, Ultimate SD Upscale – With Ultimate SD Upscale “scale” set to 1.
- Specilaized keywords / separate renders per topic – Render engines get easily confused. Especially when rendering on high resolutions. (Faces show up where they are not supposed to be, etceteral). This is why, when an image contains (for instance) people, buildings and vehicles, I will do a series of separate renders per topic, usic generic keywords per topic (“walls, arches, windows, roofs” for buildings, “faces, eyes, fabric, shoes” for people, “metal, wheels, cars” if there are cars in the image, and so on). This way, the render engine can focus on one topic per render, producing the best it can for that subject.
- Lineart, Tile, Depth in Stable Diffusion – To “extract” the shapes and definitions and force the new renders to look like my composite image.
- Denoising strenght – Set between .45 and .75. Higher values = more creative variations.
Ultimate SD Upscale will tile the renderprocess, so that my GPU will not get out of memory with images of 3076 x 3076 pixels and higher.
Tile/Blur is crucial in this process to generate reduce the seams and produce a stable result. I feed Tile_resample / “.._tile” the 1024 x 1024 base image and then set it to a value around .45. this will force the render engine to respect the values set in the image, so that the reseult renders A lower value will allow the render engine to be (more) creative with the details.
Several renders
I do several renders, for several reasons:
- Details, cherry picking – Each render with each different render engine will produce different results and different type of eastatics on those details. By picking the best, I get an overall combination of all that is best.
- Specialized renders, bettter details per subject – As said: each subject is rendered better if you do a specialized render with keywords catered for that subject. I then combine the results.
Step 5: Combine the high quality results
- Cherry pick – From the high-resolution re-renders I cherry pick those which show best results on specific topics and areas in the image.
- Layer and mask – I then use Krita to layer them and make those details visible that please me the most via masking.
The quality of the end result is dependend on many things. As discussed before.


Leave a comment